1
2
3
4
5
6
7
8
9
10
11
12
13
14
15
16
17
18
19
20
21
22
23
24
25
26
27
28
29
30
31
32
33
34
35
36
37
38
39
40
41
42
43
44
45
46
47
48
49
50
51
52
53
54
55
56
57
58
59
60
61
62
63
64
65
66
67
68
69
70
71
72
73
74
75
76
77
78
79
80
81
82
83
84
85
86
87
88
89
90
91
92
93
94
95
96
97
98
99
100
101
102
103
104
105
106
107
108
109
110
111
112
113
114
115
116
117
118
119
120
121
122
123
124
125
126
127
128
129
130
131
132
133
134
135
136
137
138
139
140
141
142
143
144
145
146
147
148
149
150
151
152
153
154
155
156
157
158
159
160
161
162
163
164
165
166
167
168
169
170
171
172
173
174
175
176
177
178
179
180
181
182
183
184
185
186
187
188
189
190
191
192
193
194
195
196
197
198
199
200
201
202
203
204
205
206
207
208
209
210
| <!DOCTYPE html>
<html lang="en">
<head>
<meta charset="UTF-8" />
<meta name="viewport" content="width=device-width, initial-scale=1.0" />
<title>Gryro With React</title>
<style>
body {
height: 100vh;
margin: 0;
display: grid;
place-items: center;
}
.box {
width: auto;
}
.bg {
margin: 0 auto;
width: 85.06666667vw;
height: 55vw;
background-image: url("https://i.imgur.com/FZNcwts.png");
background-size: contain;
background-position: center;
background-repeat: no-repeat;
position: relative;
}
.bg .hiddenText {
font-size: 3.7vw;
transform: translateZ(0);
position: absolute;
box-sizing: border-box;
padding-top: 12.26666667vw;
left: 0;
width: 100%;
height: 100%;
text-align: center;
-webkit-mask-size: 34.13333333vw 34.13333333vw;
mask-size: 34.13333333vw 34.13333333vw;
-webkit-mask-image: url("https://i.imgur.com/nWRUuqv.png");
mask-image: url("https://i.imgur.com/nWRUuqv.png");
-webkit-mask-repeat: no-repeat;
mask-repeat: no-repeat;
transition: all ease 0.2s;
-webkit-mask-position: 25.565617vw 6.13333333vw;
mask-position: 25.565617vw 6.13333333vw;
}
.bg .lens {
position: absolute;
top: 6.13333333vw;
left: 25.33333333vw;
background-image: url("https://i.imgur.com/FOUMIQ6.png");
background-size: 100% 100%;
background-repeat: no-repeat;
width: 34.13333333vw;
height: 34.13333333vw;
transition: transform ease 0.2s;
transform: translateX(74.9%);
}
</style>
</head>
<body>
<div id="root"></div>
<script type="module">
import React, {
useCallback,
useEffect,
useState,
} from "https://esm.sh/react@18";
import ReactDOM from "https://esm.sh/react-dom@18";
import throttle from "https://cdn.skypack.dev/lodash@4.17.21/throttle";
const useDeviceOrientation = () => {
const [error, setError] = useState(null);
const [orientation, setOrientation] = useState(null);
const onDeviceOrientation = throttle((event) => {
setOrientation({
alpha: event.alpha,
beta: event.beta,
gamma: event.gamma,
});
}, 100);
const revokeAccessAsync = async () => {
window.removeEventListener("deviceorientation", onDeviceOrientation);
setOrientation(null);
};
const requestAccessAsync = async () => {
if (!DeviceOrientationEvent) {
setError(
new Error(
"Device orientation event is not supported by your browser"
)
);
return false;
}
if (
DeviceOrientationEvent.requestPermission &&
typeof DeviceMotionEvent.requestPermission === "function"
) {
let permission;
try {
permission = await DeviceOrientationEvent.requestPermission();
} catch (err) {
setError(err);
return false;
}
if (permission !== "granted") {
setError(
new Error(
"Request to access the device orientation was rejected"
)
);
return false;
}
}
window.addEventListener("deviceorientation", onDeviceOrientation);
return true;
};
const requestAccess = useCallback(requestAccessAsync, []);
const revokeAccess = useCallback(revokeAccessAsync, []);
useEffect(() => {
return () => {
revokeAccess();
};
}, [revokeAccess]);
return {
orientation,
error,
requestAccess,
revokeAccess,
};
};
const getTransformDegree = (value, threshold = 30, max = 74.9) => {
if (value) {
const sy = value > 0 ? "" : "-";
const degree = `${Math.min(
(Math.abs(value) / threshold) * 100,
max
)}`;
return Number(`${sy}${degree}`);
}
return 0;
};
const Demo = ({ orientation }) => {
const degree = getTransformDegree(
orientation === null || orientation === void 0
? void 0
: orientation.gamma
);
const yDegree = getTransformDegree(
orientation === null || orientation === void 0
? void 0
: orientation.beta,
20,
40
);
const transform = `translate(${degree}%, ${yDegree}%)`;
const maskPosition = `${25.565617 + (degree / 100) * 34.133}vw calc(${
25.565617 + (yDegree / 100) * 34.133
}vw - 18.4vw)`;
return React.createElement(
"div",
{ className: "bg" },
React.createElement(
"div",
{
className: "hiddenText",
style: {
maskPosition,
"-webkit-mask-position": maskPosition,
},
},
React.createElement("div", null, "Hidden Text"),
React.createElement("div", null, "Hidden Text"),
React.createElement("div", null, "Hidden Text"),
React.createElement("div", null, "Hidden Text")
),
React.createElement("div", {
className: "lens",
style: {
transform,
},
})
);
};
const App = () => {
const { orientation, requestAccess, revokeAccess, error } =
useDeviceOrientation();
const errorElement = error
? React.createElement("div", { className: "error" }, error.message)
: null;
return React.createElement(
"div",
{ className: "box" },
React.createElement(
"button",
{ onClick: requestAccess },
"Request For Gyro Access"
),
errorElement,
React.createElement(Demo, { orientation: orientation })
);
};
ReactDOM.render(
React.createElement(App, null),
document.getElementById("root")
);
</script>
</body>
</html>
|
 Description Of Deviceorientation Data
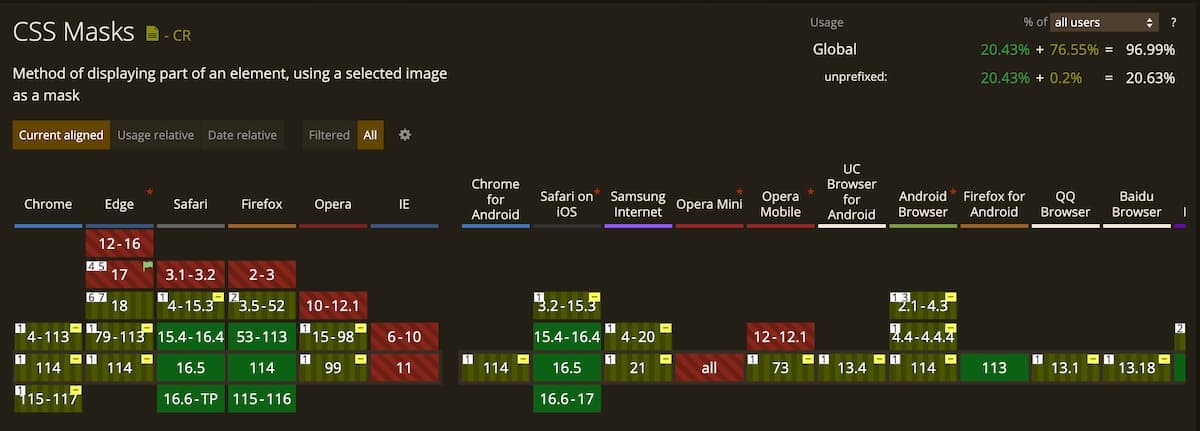 Can I Use "Mask" In CSS